Whatsapp:+86 17852301313 Email:tinghe.lv@yimaotomg999.com
How to Fix a Clogged Drip Emitter (Before Your Plants Pay the Price)
The first sign is always the same
A plant that looks worse than its neighbors. Same bed, same sun, same variety—but one tomato is wilting while the rest are thriving. You walk the drip line, and there it is: an emitter barely dripping, or worse, bone dry.
I’ve been there. More than once. And every time, I’ve wasted 20 minutes fiddling with timers and pressure regulators before checking the obvious thing—the emitter itself was clogged.
Clogged emitters are the most common failure point on any drip system. The tiny orifices that make drip irrigation so efficient are also what make it vulnerable. A spec of sand, a flake of calcium, a bit of biofilm—any of these can shut down an emitter completely.
Here’s exactly how I diagnose and fix them, in order of least to most work. Start at step one and stop when the water flows.
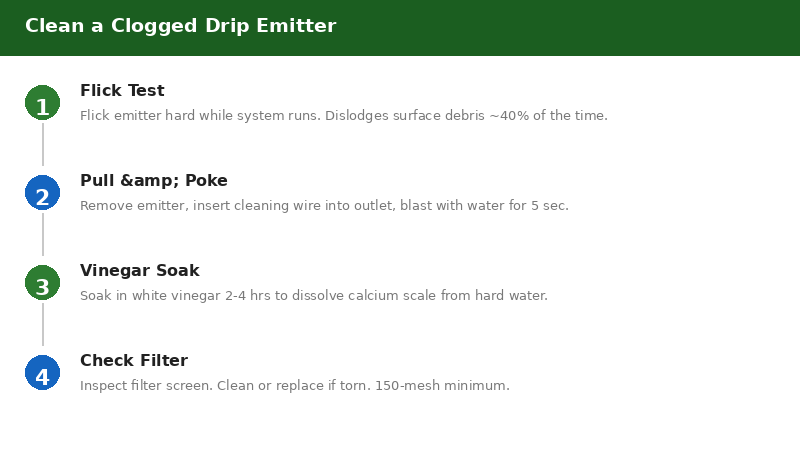
Step 1: The flick test
This sounds stupid, but it works maybe 40% of the time. Turn the system on. Walk to the problem emitter. Flick it—hard—with your finger.
Sometimes a small particle is just sitting at the mouth of the emitter, held in place by surface tension. A sharp flick dislodges it. I’ve “fixed” dozens of emitters this way over the years. Takes two seconds. Worth a try before you get out any tools.
If the emitter is a flag type (the kind with a colored cap that you can adjust), try twisting the cap a quarter-turn in each direction while water is running. The mechanical movement can break up whatever’s stuck inside.
Step 2: Pull and poke (for PC emitters)
Pressure-compensating emitters—the ones that deliver a steady flow regardless of pressure—have internal diaphragms. A grain of sand lodged in the diaphragm is the usual culprit.
Tools you need: a thin wire or a dedicated emitter cleaning tool (Dig and Rain Bird both make these for under $10), or a sewing needle in a pinch.
With the system running:
- Pull the emitter off the 1/4″ micro tubing or unscrew it from the main line.
- Gently insert the cleaning wire into the outlet hole. Push it in and out a few times.
- Point the emitter away from your face (learned that one the hard way) and let water blast through it for 5 seconds.
- Reattach and check the flow.
On PC emitters rated at 1 GPH, a clean emitter will fill a 16 oz cup in roughly 2 hours. For a 0.5 GPH emitter, about 4 hours. Don’t just eyeball “looks wet.” Measure it once so you know what normal looks like.
Step 3: Vinegar soak for mineral buildup
If your water is hard—and most of us are on well water or municipal water with high mineral content—calcium and magnesium carbonate are slowly building up inside every emitter in your system.
I learned this lesson at my parents’ place in Arizona. Their drip system went from “working fine” to “half the emitters dead” in a single season. The problem wasn’t debris. It was scale. White, crusty mineral deposits you could scrape off with a fingernail.
For mineral-clogged emitters:
- Remove the affected emitter from the line.
- Drop it in a cup of white vinegar (5% acetic acid, the grocery store stuff).
- Let it soak for 2-4 hours. Overnight if it’s really bad.
- Rinse with clean water. Reinstall and test.
The vinegar dissolves calcium carbonate. If the buildup is severe—black iron deposits from well water, or a system that hasn’t been maintained in years—this might not be enough, and you’ll need to look at a system-wide acid flush (Step 6). But for a handful of problem emitters, vinegar works.
Step 4: Check the filter (before you curse the emitter again)
Here’s a mistake I see a lot: someone cleans ten clogged emitters, reattaches them, and two weeks later they’re clogged again. They blame the emitters. The real problem is upstream.
A drip system’s filter is its immune system. If the filter is torn, bypassed, or just too coarse for your water, emitters will keep clogging no matter how many times you clean them.
Check these things in order:
- Is there even a filter? You’d be surprised how many DIY installs skip this. A $15 Y-filter or T-filter with a 150-mesh screen (100 microns) is the baseline for most residential drip systems.
- Is the mesh rating appropriate? For municipal water, 150 mesh (100 micron) is usually fine. For well water or pond water, step up to 200 mesh (75 micron). If you’re running 0.5 GPH emitters—which have smaller orifices than 1 or 2 GPH emitters—200 mesh is not optional.
- Has the screen been cleaned in the last month? Unscrew the filter housing, pull out the screen, rinse it under running water. If the screen is discolored (brown from iron, green from algae), soak it in a 50/50 vinegar-water mix for 30 minutes.
- Is the screen torn? Hold it up to the light. A pinhole is all it takes for debris to bypass the filter entirely. Replacement screens cost about $3-5.
Step 5: Flush the entire system
Here’s what most people don’t realize: even with a good filter, fine sediment settles in the mainline and laterals. Over time, it accumulates enough that normal water flow stirs it up and carries it straight into your emitters.
Flushing is preventive maintenance, but if you’re already dealing with clogs, do it now:
- Turn off the system.
- Go to the end of each drip line—the farthest point from the water source. You should have flush caps or ball valves at the ends. If you don’t, install them. They cost about $1 each and make this process 10x easier.
- Open all the flush valves (or remove the end caps).
- Turn the system on and let water blast through for 2-3 minutes per line.
- Turn it off, close the valves, and run the system normally. Check your emitters.
I do this every 4-6 weeks during the growing season. If your water is dirty or you’re pulling from a pond, do it every 2 weeks.
Step 6: When all else fails—chemical flush
If you’ve cleaned individual emitters, checked the filter, flushed the lines, and emitters are still clogging within days, you’re dealing with either biological growth (algae, bacteria slime) or hard mineral scale that’s built up inside the entire tubing network.
This is a system-level problem that needs a system-level fix:
For biological growth (slimy brown/green film inside tubing):
- Inject household bleach (5.25% sodium hypochlorite) at a 1-2 ppm free chlorine concentration. For a typical residential system, that’s about 2-3 ounces of bleach per 100 gallons of irrigation water.
- Let it sit in the lines for 30 minutes, then flush thoroughly.
- Do not exceed 5 ppm—chlorine degrades poly tubing and rubber seals at higher concentrations.
For mineral scale (white crusty deposits):
- Use phosphoric acid or a commercial drip system cleaner like N-pHuric or Line Cleaner. These are designed specifically for irrigation systems and won’t damage your tubing.
- Inject at the manufacturer’s recommended rate—typically 1-3 ounces per gallon of water flow.
- Circulate for 30-60 minutes, then flush thoroughly with clean water.
Safety note: Wear gloves and eye protection. Acid and concentrated bleach are not things you want on your skin. And flush your system completely before letting plants back on it—roots don’t appreciate chlorine cocktails.
Step 7: Prevention (so you never do this again)
This is the part where I tell you what I wish someone had told me five years ago. These four things will cut your clogging problems by about 90%:
- Install a proper filter and check it monthly. 150 mesh minimum. 200 mesh if you have well water or are using emitters rated below 1 GPH. A $25 disc filter will outperform a screen filter and is easier to clean.
- Use a pressure regulator rated for drip. Drip systems want 20-30 PSI. Higher pressure forces debris deeper into emitter orifices. A $15 preset 25 PSI regulator at the start of each zone is cheap insurance.
- Install flush valves at the end of every lateral line. Without end-of-line access, flushing is a hassle you won’t do. Flush valves make it a 5-minute job.
- Flush on a schedule. Not “when I remember.” Pick the first Saturday of the month, or set a phone reminder. Routine flushing keeps sediment from ever building up enough to cause clogs.
One last thing
If you’ve done everything on this list and one particular emitter keeps clogging, replace it. Seriously. Emitters cost $0.50 to $2. After three cleanings, the internal passages can get roughened or warped, making them even more prone to clogging. Your time is worth more than a two-dollar emitter.
I keep a bag of spare 1 GPH emitters in my irrigation toolbox along with a cleaning tool, a spare filter screen, and a few extra goof plugs. Total cost: about $25. Total time saved: incalculable.