Whatsapp:+86 17852301313 Email:tinghe.lv@yimaotomg999.com
How to Fix Clogged Drip Emitters (And Stop Them From Clogging Again)
The moment you realize half your plants aren’t getting water
I’ve been there. You walk out to the garden on a Saturday morning, coffee in hand, ready to admire your tomatoes — and one bed is bone dry while the next one is practically a swamp. You crouch down, check a few emitters, and nothing. Not even a drip.
Clogged emitters are the most common headache in drip irrigation. I’ve dealt with them in my own raised beds, in client installs, and in systems that were supposedly “maintenance-free.” Nothing is maintenance-free.
Here’s how to fix the ones that are clogged right now, and what to do so you’re not back on your knees cursing at plastic fittings three weeks from now.
Why your emitters clog (it’s usually one of three things)
Drip emitters have tiny openings, typically 0.5 to 1.5 millimeters across. It doesn’t take much to block them. In my experience, clogs come from:
- Mineral buildup. If you’re on well water or hard municipal water, calcium and magnesium carbonates slowly crust up inside the emitter. The water still flows, but less and less until one day it doesn’t. White, chalky residue on the outside of emitters is your clue.
- Sediment and debris. Sand, silt, bits of pipe scale, even tiny fragments of Teflon tape from threaded fittings get pushed through the tubing and jam at the narrowest point: the emitter orifice.
- Biological gunk. Algae and bacterial slime love warm, wet, nutrient-rich environments. If sunlight hits your tubing (especially the clear or translucent stuff), you’re basically running a tiny algae farm. Once it forms, it coats everything.
Most of the time it’s a combination. A little mineral scale roughens the surface, debris catches on it, biofilm glues it all together. Gross, but fixable.
How to spot a clogged emitter before your plants tell you
Plants are lousy communicators. By the time a tomato plant is wilting, the emitter has probably been clogged for days. Here’s what I look for instead:
- Uneven wetting patterns. After a watering cycle, the soil around each emitter should have a consistently sized wet spot. If one is noticeably smaller or completely dry, the emitter is restricted or blocked.
- Visual inspection. Run the system and actually watch each emitter for 10 seconds. A 1 GPH emitter should produce a steady drip roughly every 2-3 seconds, not a trickle or a hesitant “maybe” every 15 seconds.
- The catch-can test. Place identical containers under several emitters, run the system for 10 minutes, and compare the volumes. Differences of more than 15-20% mean something’s off.
I do a quick walkthrough once every two weeks during the growing season. Takes five minutes and catches problems before plants suffer.
Cleaning an emitter that’s already clogged
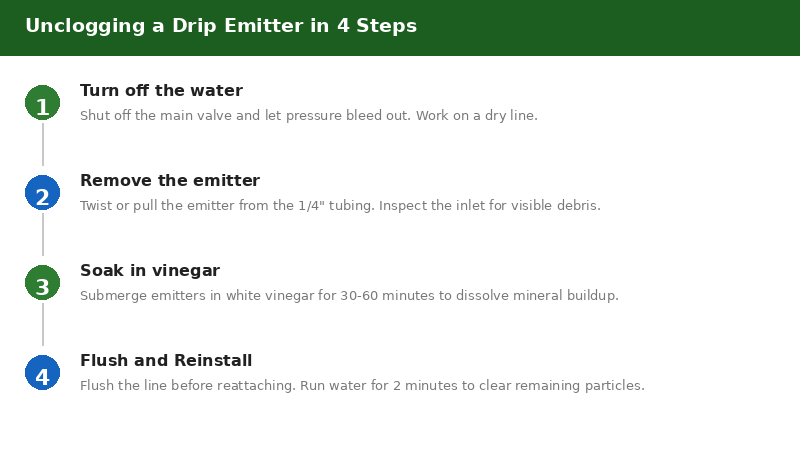
If you’ve got a few emitters not flowing, here’s the process I use. It’s low-tech and takes about an hour for a typical raised bed setup.
- Kill the water. Turn off the main valve and let the pressure bleed out through the lowest point in the system. You don’t want water spraying everywhere when you pull an emitter.
- Pop the emitter off. Most 1/4″ barbed emitters twist off the micro-tubing with a firm pull. Flag emitters (the ones with the colored tops) usually unscrew or pull straight out. If it’s a PC (pressure-compensating) emitter, be gentler since the internal diaphragm is delicate.
- Soak in vinegar. Fill a jar with plain white vinegar and drop the emitters in. 30 minutes is usually enough for light mineral buildup. If they’re heavily crusted, leave them for an hour. The vinegar dissolves calcium carbonate without damaging the plastic.
- Poke the orifice — carefully. After soaking, use a thin wire or a dedicated emitter cleaning tool (they cost about $5 for a set). Don’t use a toothpick. Wood splinters can break off inside. One gentle pass through the opening is all you need.
- Rinse and flush. Rinse the emitters in clean water, but more importantly: before you reattach them, open the end cap on your drip line and run water through for 2 full minutes. This flushes out whatever debris caused the clog so it doesn’t immediately re-clog the cleaned emitter.
- Reattach and test. Put the emitters back, turn the water on, and watch. If an emitter still isn’t flowing after this treatment, it’s probably dead. Replace it. They’re cheap.
When to just replace the damn thing
I’m a fan of fixing things, but emitters are consumable parts. If you’ve soaked, poked, and flushed and it’s still not right, toss it. A replacement 1 GPH emitter costs about $0.50. Your time is worth more than that.
Signs an emitter is beyond saving:
- Flow rate is way off even after cleaning (PC emitters have internal parts that fail)
- The plastic body is cracked or the barbs are deformed
- You can see mineral deposits inside that won’t dissolve (that’s not calcium anymore — it’s silica or iron, and vinegar won’t touch it)
Stop them from clogging in the first place
Cleaning emitters is satisfying in a “look what I fixed” kind of way, but doing it every month gets old fast. Here’s what actually prevents clogs, based on what I’ve seen work across dozens of installations:
Get a real filter — 150 mesh minimum. Those little screen washers that come with basic drip kits are nearly useless. Install a proper inline filter (150 mesh / 100 micron) after your backflow preventer and before your pressure regulator. Y-type filters with a flush valve are my preference; you can clean them without disassembling anything. Check and rinse the screen monthly during the growing season.
Use a pressure regulator. Drip systems are designed for 20-30 PSI. If your house pressure is 60+ PSI (and it probably is), unregulated pressure forces debris deeper into emitters and can actually blow fittings apart. A 25 PSI preset regulator costs about $15 and screws onto your hose bib or main line.
Flush your lines regularly. Open the end caps or flush valves at the end of each drip line monthly. Let it run until the water runs clear. Usually 1-2 minutes. This is the single cheapest, most effective thing you can do. I put flush valves on every line now; a quarter-turn and it’s done.
Keep sunlight off your tubing. If your mainline tubing is exposed to direct sun, algae will grow inside it. Use black polyethylene tubing (not clear vinyl), cover it with mulch, or run it under landscape fabric. Even 1/2″ poly tubing with a 0.040″ wall thickness blocks enough UV to make a difference.
Match your emitter type to your water. If you’re on hard well water, pressure-compensating emitters with labyrinth flow paths are more forgiving than simple orifice emitters. The tortuous path design is harder to clog completely, and PC emitters self-flush to some degree during startup and shutdown.
What I’d do if I were starting over
If I were building a new drip system tomorrow, I’d spend the extra $40 upfront on a good filter, a pressure regulator, and flush valves at the end of every run. That’s less than the cost of replacing stressed plants or spending Saturday mornings on my knees cleaning emitters.
Start there. Walk your system every two weeks. Flush monthly. And when you do find a clogged emitter — and you will — now you know what to do about it.