Whatsapp:+86 17852301313 Email:tinghe.lv@yimaotomg999.com
How to Keep Your Drip Irrigation System Running Like New (Without Losing Your Weekend to It)
How to Keep Your Drip Irrigation System Running Like New (Without Losing Your Weekend to It)
I’ve been installing and fixing drip systems for over a decade, and here’s something that surprises most people: the number one reason drip irrigation fails isn’t cheap parts or bad design. It’s neglect. People treat it like a sprinkler system. Set it and forget it. Then August rolls around and they’re staring at fried tomato plants wondering what happened.
Drip irrigation is simple. But simple doesn’t mean zero maintenance. An hour twice a year catches 90% of problems before they cost you a crop or spike your water bill. Here’s what actually matters, based on the stuff I fix every summer.
The Three Things That Kill Drip Systems
Every service call I’ve done boils down to one of three problems. If you know these, you’re ahead of most homeowners.
Clogged emitters
This is the big one. Drip emitters have tiny openings, typically 0.5 to 2 gallons per hour. They plug up from sediment, mineral buildup, or algae. Even a little debris in the line can take out a whole row of plants. I’ve pulled apart emitters that looked like they’d been packed with toothpaste. Calcium carbonate, mostly. If you’ve got hard water, this is your life now.
Pressure problems
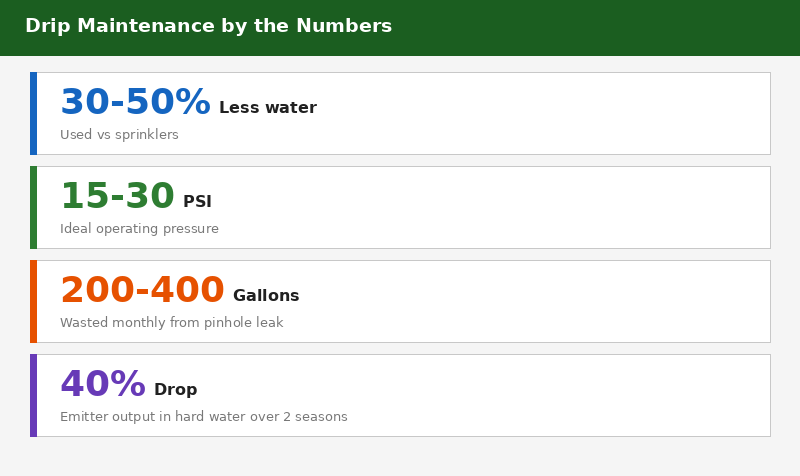
Drip systems want 15 to 30 PSI. That’s it. Most home water supplies come in at 50 to 70 PSI. If your pressure regulator fails, or you never installed one, you’re forcing water through emitters at triple the intended pressure. Fittings pop apart. Tubing splits. Half the water turns to mist instead of soaking into soil.
Physical damage
Lawnmowers. String trimmers. Dogs digging. Tree roots growing into lines. I watched a German shepherd chew through 40 feet of drip tubing in one afternoon because the water inside made a noise he liked. Rodents gnaw on lines during drought. This stuff happens. Catch it before you’ve got a dry zone.
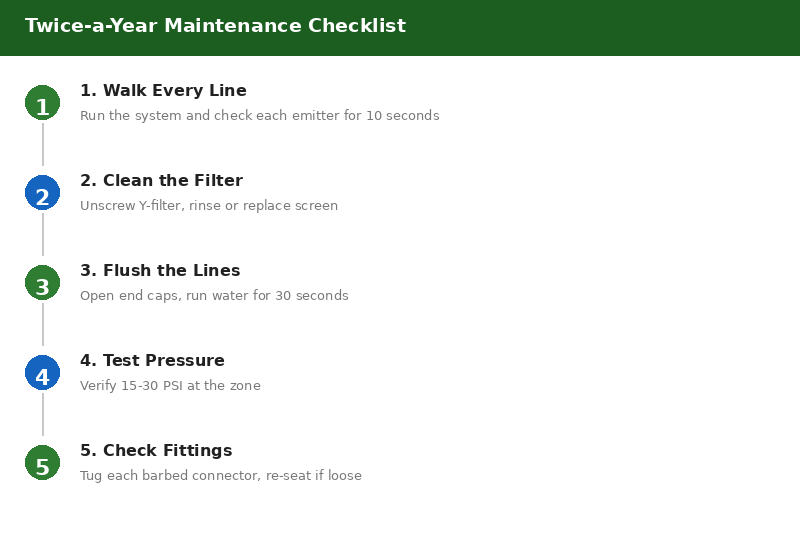
Your Twice-a-Year Walkthrough (Spring and Mid-Summer)
I do this on my own system. Takes about an hour for a typical quarter-acre setup, less if you’re methodical.
First, run the system and walk every line. Don’t just glance. Bend down and watch each emitter for 10 seconds. Water dripping evenly? Good. One plant dry while its neighbor is pooling? That emitter’s clogged or the line’s kinked. Squint at the tubing. Hairline splits spray a fine mist you’ll miss if you’re moving too fast.
Check the filter next. Most drip systems have a Y-filter or screen filter between the valve and the first emitter. Unscrew it. If the screen doesn’t look like clean metal or plastic, rinse it under a hose or swap it out. Filters cost about $8. Replacing emitters across an entire zone costs a lot more in time and parts.
Flush the lines. Open the end caps on your main and lateral lines, turn the water on for 30 seconds, let it blast out whatever’s built up. The water runs brown at first. Sediment, biofilm, general crud. Close the caps and you’re done. I flush every spring and again in July when heat stress peaks.
Test your pressure regulator. If you own a pressure gauge that threads onto a hose bib, use it. Anything above 35 PSI at the drip zone means the regulator is failing. No gauge? Turn on the zone and put your hand near the emitters. If water is spraying instead of dripping, pressure’s too high. Regulators are $15 to $25 and last about 3 to 5 seasons. Just replace it.
Inspect fittings and connections. Polyethylene tubing shrinks and expands with temperature. Barbed fittings work loose over a few seasons. Give each connection a gentle tug. If it slides out with almost no resistance, cut off the stretched end and push it onto a fresh section of tubing. Thirty seconds per fitting.
What You Actually Need in Your Repair Kit
You don’t need a truck full of parts. I keep five things in a small toolbox and it covers 80% of what I run into:
- A handful of spare emitters (0.5 GPH, 1 GPH, and 2 GPH in a multi-pack)
- Goof plugs for sealing holes when you move or remove emitters
- A tubing punch. Using a nail or screwdriver tears the hole too wide
- Two or three couplers and a short length of spare 1/2-inch tubing for patching breaks
- A replacement filter screen or cartridge for your specific filter model
All of that fits in a shoebox. Total cost is maybe $40. It’ll save you three trips to the hardware store when something leaks on a Sunday afternoon.
Signs You’re In Trouble (Before the Plants Tell You)
Plants are lousy communicators. By the time leaves wilt or yellow, the problem’s been going for a week or more. Watch for these instead.
Water pooling where it shouldn’t be. A wet spot in the middle of a dry zone means there’s a leak underground or a fitting that’s separated. Dig gently around it. Nine times out of ten it’s a barbed connector that pulled loose.
Your water bill spikes for no obvious reason. A pinhole leak in tubing can waste 200 to 400 gallons a month without leaving a visible puddle. If your usage jumps and you haven’t changed your watering schedule, something’s leaking.
Some plants thriving, others struggling in the same zone on the same schedule. That’s almost always an emitter clog or a kinked line specific to those plants. Don’t increase the run time for the whole zone. Fix the individual emitter.
Hard Water? You’ve Got Extra Work
If your water leaves white crust on faucets and showerheads, your drip emitters are getting the same treatment from the inside. Calcium carbonate precipitates out of hard water and narrows the emitter orifice over time.
I’ve measured emitter output drop by 40% over two seasons in hard-water areas with no filtration. The fix is straightforward: install an in-line calcium filter or use a phosphoric acid drip line cleaner once a season. The cleaner costs about $20. You inject it through the filter housing, run it through the system for an hour, then flush thoroughly. Emitters flow like new after.
If you’re on well water, test for iron bacteria too. That’s a different beast. Reddish-brown slime that coats everything. Chlorine injection is the standard fix but it’s a bigger project than most homeowners want to tackle. For mild cases, shocking the system with hydrogen peroxide (3% solution, food grade) once a season keeps it under control.
When to Call Someone
I’m not going to pretend every fix is DIY-friendly. Call a pro if:
- The leak is under a patio, driveway, or retaining wall and you can’t access it without cutting concrete
- Your pressure is consistently above 35 PSI even after replacing the regulator. You might have a backflow preventer issue or need a different regulator type
- Multiple zones are failing and you can’t trace the wiring or valves
- You’ve got iron bacteria or heavy sediment that keeps returning despite flushing and filtering
A service call runs $75 to $150 depending on your area. If you’ve already burned two weekends troubleshooting and your plants are suffering, the math works out.
The Bottom Line
Drip irrigation is the most efficient way to water, period. You’re putting water directly at the root zone, losing almost nothing to evaporation or wind. A well-maintained drip system uses 30% to 50% less water than sprinklers covering the same area. My customers who stay on top of maintenance see those numbers. The ones who don’t end up hand-watering in August while waiting for a service call.
A spring walkthrough, a mid-summer check, and a small repair kit in the garage. That’s the whole maintenance regimen. Do those three things and your system will outlast most of the plants it’s watering.