Whatsapp:+86 17852301313 Email:tinghe.lv@yimaotomg999.com
How to Fix Clogged Drip Emitters (Without Replacing Everything)
The moment you realize half your emitters aren’t dripping
You walk out to the garden on a Saturday morning and something’s off. The tomato bed looks dry. You crouch down, poke a finger into the soil, and yep, bone dry three inches down. Meanwhile the lettuce row is a swamp because you cranked the timer to compensate.
Clogged emitters. There’s no way around it. If you run a drip system long enough, some of them will clog. The question is whether you’re going to spend $12 and an hour fixing the problem or $80 and a weekend replacing lines you didn’t need to.
I’ve cleaned hundreds of emitters across half a dozen gardens I’ve built for clients. Here’s what I’ve learned about what actually works, and the stuff that’s a waste of time.
Why emitters clog (and why “just buy new ones” is bad advice)
There are three things that stop up an emitter, and only one of them means the emitter is dead.
Mineral scale. If you’re on well water or hard municipal water, calcium and magnesium carbonate build up inside the tiny orifice. The emitter still works, it’s just constipated. This is fixable.
Physical debris. Sand, silt, bits of algae, tiny root hairs that found their way in through a puncture. Also fixable, usually.
UV damage. The plastic gets brittle, the flow path warps, and the emitter never drips at the right rate again. This one’s a goner.
The reason “buy new ones” is bad blanket advice is that most clogs are from scale or debris. You figure out which one you’re dealing with, and you fix it. Out of maybe 200 emitter problems I’ve diagnosed, I’d guess fewer than 30 actually needed replacement.
What you’ll need
- A push-pin or sewing needle (straightened paperclip works too)
- White vinegar (the 5% stuff from the grocery store)
- An old toothbrush
- Small needlenose pliers or hemostat
- A bucket or plastic tub
- Replacement 1 GPH or 0.5 GPH emitters (whichever matches yours; don’t mix rates on the same line)
Total cost: probably under $5 if you already have vinegar and a paperclip. A pack of 25 Rain Bird or DIG emitters runs about $8-12 if you do need replacements.
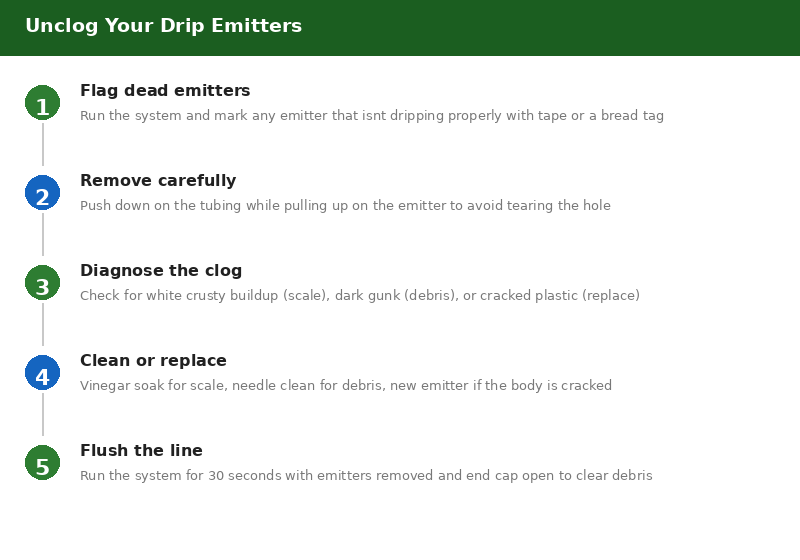
Step 1: Flag the dead ones
Run the system and walk the line. Touch every emitter. A working 1 GPH emitter puts out a steady drip: about one drop every 2 seconds. If it’s a slow inconsistent dribble or nothing at all, mark it with a piece of colored tape or a bread tag.
Don’t skip this step. Nothing worse than pulling 15 emitters, cleaning them, and realizing you forgot which ones they were.
Also check the emitter itself for cracks. If the plastic body is split or the outlet looks warped, skip the cleaning steps. That one needs replacement.
Step 2: Remove the emitter without wrecking the tubing
Most drip emitters on 1/2″ poly tubing are barbed and press-fit. You can pull them out, but if you just yank on the emitter body you’ll tear the tubing hole and now you’ve got a leak.
Instead: push down on the tubing on one side of the barb while pulling up on the emitter. The goal is to peel the tubing away from the barb, not pull the barb through a tight hole. I use needlenose pliers on the emitter body and my thumb to press the tubing down. After the first couple you’ll get the feel for it.
If the emitter is on 1/4″ micro tubing, just cut the tubing an inch behind the emitter and toss both. 1/4″ line is cheap and the barb holes in it stretch out permanently.
Step 3: Diagnose before you clean
Look at the emitter. Hold it up to the light.
If you see white crusty buildup inside the inlet or outlet: mineral scale. Go to Step 4a.
If you see dark gunk or can’t see light through it: physical debris. Go to Step 4b.
If the plastic looks chalky, the barb is stripped, or the body is cracked, toss it, press in a new one, move on.
Step 4a: Mineral scale (vinegar soak)
Drop the emitter in a cup of straight white vinegar. Let it sit for 2-3 hours. Overnight if it’s really crusted.
After soaking, fish it out and scrub the inlet and outlet with a toothbrush. Then use your needle to gently clear the orifice. Don’t ream it out or you’ll change the flow rate. You just want to break up any remaining scale that the vinegar loosened but didn’t dissolve.
Rinse in clean water, blow through it with your mouth to clear any loose particles, and it should be good.
Vinegar doesn’t work on every type of mineral deposit, but it handles calcium carbonate (the most common scale in irrigation water) and it’s cheap and nontoxic. If vinegar doesn’t cut it, a diluted CLR soak usually does, but rinse thoroughly before reinstalling.
Step 4b: Physical debris (mechanical cleaning)
This is where the needle earns its keep. Push it through the emitter inlet and outlet. You’ll know you hit the clog when you feel resistance and then a sudden release.
For flag emitters and button drippers (the most common types on residential systems) the flow path is basically a tiny maze inside the plastic body. You can’t fully disassemble most of them. But clearing the inlet and outlet with a needle, followed by flushing with water under pressure (I use a syringe or just hold it up to a hose bib), gets the gunk out about 80% of the time.
If the emitter has a removable cap (some adjustable drippers do), pop it off and clean the diaphragm inside. A surprising amount of gunk gets trapped there. Wipe it with a damp cloth, reassemble, done.
Step 5: Flush the line before reinstalling
This is the step people skip and then wonder why the same emitters clog again next week.
With the emitters still removed, uncap the end of the line and run the system for about 30 seconds. Whatever debris was sitting in that section of tubing will flush out. You’ll see dirty water come out the holes where the emitters were, and that’s the point.
Cap the end, press the cleaned emitters back in, and run the system again to check.
When to just replace instead
I’m not dogmatic about this. Sometimes replacing is faster and you’ve got better things to do on a Saturday. Replace the emitter if:
- The plastic body is cracked, chalky, or the barb won’t stay seated in the tubing
- You’ve cleaned it twice and it still doesn’t drip right
- The flow rate is off: a 1 GPH emitter putting out 3 GPH means the internal flow path is damaged, and that plant’s getting overwatered
- You’re dealing with a 10-cent flag emitter and you value your time at more than 10 cents
Prevention: stop the clogs before they start
The fix for clogged emitters isn’t cleaning. It’s not needing to clean them. A few things that make a real difference:
Use a filter. A 150-mesh screen filter on your mainline catches sand, silt, and rust particles. They cost $15-25 and pay for themselves in the first season. Clean the screen once a month during the growing season. Takes 30 seconds.
If you’re on well water, use a disc filter. Screen filters clog too fast with the fine sediment in well water. A disc filter handles it better. These run $30-50 but last years.
Flush your lines. Open the end caps and run the system wide open for a minute once a month. The crud that builds up in the lines gets pushed out instead of into your emitters.
Pressure regulator. Emitters are designed to run at 25-30 PSI. If your house pressure is 60+ PSI and you’re not using a regulator, you’re forcing water through the emitter too fast, which can cause cavitation and micro-damage to the flow path. A preset 25 PSI regulator costs about $10.
The bottom line
Next weekend, give yourself an hour. Walk the lines. Flag the dead emitters. Vinegar soak the scaled ones, needle-clean the debris-clogged ones, replace the ones that are actually shot. Flush the lines. Done.
Your plants won’t send you a thank-you note. But they’ll stop looking so thirsty.