Whatsapp:+86 17852301313 Email:tinghe.lv@yimaotomg999.com
How Much Water Pressure Do You Really Need for Drip Irrigation?
Most people overthink drip irrigation pressure. They buy the biggest pump, crank it up, and wonder why their emitters are blowing off the tubing. Or they hook up a gravity-fed barrel and can’t figure out why the far end of the garden stays dry.
The sweet spot for most home drip systems is 15 to 30 PSI. That’s it. Not 40. Not 60. Fifteen to thirty.
I learned this the hard way. My first drip setup ran straight off a spigot at 55 PSI. Worked fine for about two days. Then the 1/4″ tubing started popping off the barbs every afternoon when the sun heated things up. A $12 pressure regulator fixed it in five minutes.
Why pressure matters more than you think
Drip emitters are tiny. The opening inside a standard 1 GPH emitter is about the width of a sewing needle. They’re designed to work within a specific pressure range — usually 10 to 45 PSI for most brands. Outside that range, two things happen:
- Too low: Water barely trickles out. The emitters at the end of a long run might not get any water at all. Plants at the beginning of the line get watered, plants at the end die.
- Too high: Emitters turn into mini sprinklers. Your “1 gallon per hour” dripper is suddenly pushing 3 GPH. Fittings pop loose. Tubing splits at the connection points.
A 2023 study from the University of California Cooperative Extension tested drip systems at varying pressures and found that a 10 PSI drop below the manufacturer’s minimum reduced flow uniformity by over 40%. The plants at the end of the line got roughly half as much water as the ones near the water source.
How to figure out your starting pressure
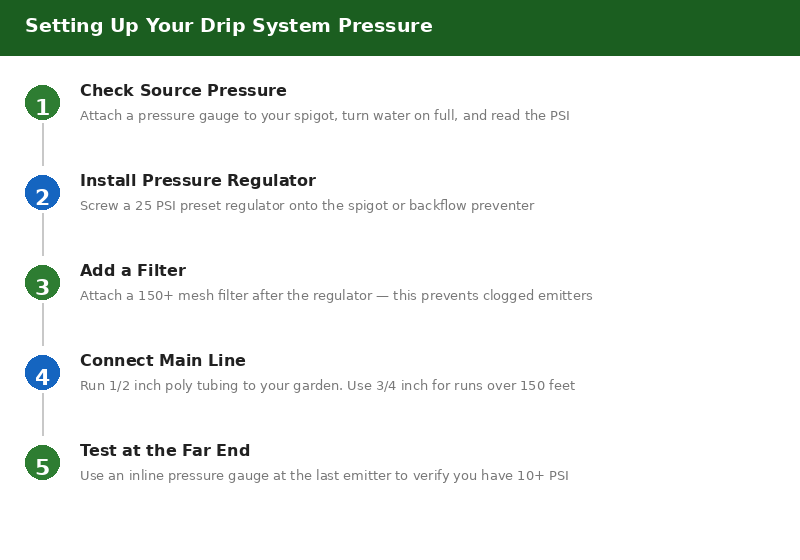
First, check what’s coming out of your water source. You need a pressure gauge — they’re about $10 at any hardware store. Screw it onto your outdoor spigot and turn the water on full. That’s your static pressure.
Typical numbers:
- City water: 40-80 PSI
- Well pump (with pressure tank): 30-50 PSI
- Gravity feed from a rain barrel 10 feet up: about 4.3 PSI (yes, that low)
If you’re on city water above 50 PSI, you need a pressure regulator. No exceptions. The Rain Bird and Senninger brands are both fine — get the 25 PSI preset model for most home gardens. They’re preset and non-adjustable, which is actually a good thing. One less thing to mess up.
Gravity systems are trickier. Every foot of elevation gives you 0.433 PSI. So a barrel 6 feet off the ground? That’s 2.6 PSI. Most drip emitters need at least 10 PSI to function. You’ll either need to raise the barrel significantly (22+ feet) or use a small booster pump.
Friction loss: the pressure killer nobody talks about
Water flowing through tubing loses pressure. The longer the run and the smaller the diameter, the worse it gets.
For 1/2″ drip tubing at 1 GPM flow rate, you lose about 2 PSI per 100 feet. Bump that to 2 GPM and the loss jumps to roughly 7 PSI per 100 feet. That means on a 200-foot run feeding a large garden, you can lose 14 PSI just pushing water through the main line.
Here’s the math that matters: if your pressure regulator is set to 25 PSI and you lose 14 PSI to friction over the run, your last emitters are only seeing 11 PSI. Push that below 10 PSI and they start underperforming or not working at all.
The fix is usually simpler than people think: use 3/4″ mainline tubing for runs over 150 feet, or split long runs into two shorter zones.
Elevation changes wreck your pressure too
Every foot of elevation gain costs you 0.433 PSI. Running drip lines up a 10-foot slope? That’s 4.3 PSI gone. Running down a slope gives it back, but uneven pressure across the zone means uneven watering.
On flat ground this doesn’t matter. On a hillside garden it matters a lot. The solution is pressure-compensating (PC) emitters. They maintain consistent flow from about 10 to 50 PSI. They cost about twice as much as standard emitters — maybe 15 cents instead of 7 cents each — and they’re worth every penny on sloped terrain.
What a good setup actually looks like
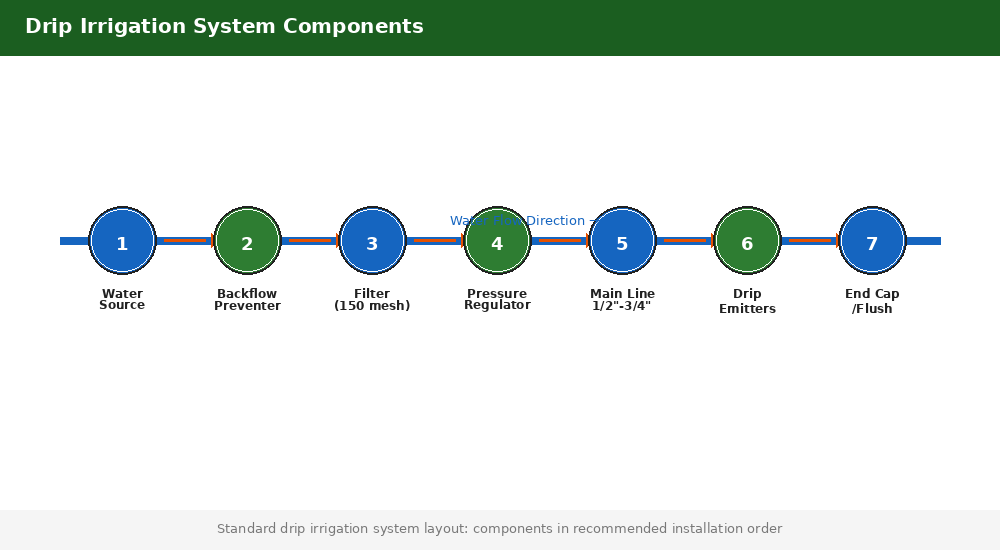
From your water source to the plants, the order should be:
- Backflow preventer (required by code almost everywhere)
- Filter (150 mesh minimum for drip — 200 mesh if your water has any sediment)
- Pressure regulator (25 PSI for most home systems)
- Mainline tubing (1/2″ for runs under 150 feet, 3/4″ for longer)
- Drip emitters or 1/4″ distribution tubing with emitters
A filter before the pressure regulator is not optional. Emitters clog. Sediment, algae, minerals — it all builds up. A $20 filter saves hours of unclogging emitters one by one with a pin. Ask me how I know.
Quick diagnostic: is your pressure right?
Walk your drip line while it’s running. Look at the emitters near the beginning and near the end. If the water pattern looks the same — steady dripping, same wetting area — your pressure is fine. If the near emitters are spraying while the far ones barely seep, you have a pressure or friction loss problem.
You can also buy inline pressure gauges with barb fittings that plug right into 1/2″ tubing. They’re about $15 and tell you exactly what’s happening at any point in the line. Overkill for a small raised bed garden, absolutely worth it for anything over 100 feet.
Bottom line: spend the $12 on a pressure regulator and the $20 on a good filter. Your plants won’t notice, but you’ll notice not having to fix blown fittings every weekend.